Building a Trading Bot Using Bitquery Kafka Streams
This is a tutorial to build a fast, automated BSC (Binance Smart Chain) sniper bot for trading newly launched Four Meme tokens. The bot detects new token launches in real time via Bitquery’s Kafka streams, buys them instantly using the Four Meme Launchpad contract, and sells them after 1 minute—aiming to capitalize on rapid price movements.
Checkout the complete codebase here if facing any issue.
Use a wallet/private key with only test funds at your own risk as this bot is highly experimental and is for educational use only!
Features
- Real-Time Token Detection:
Subscribes to Bitquery's Kafka protobuf streams to spot new Four Meme token launches within seconds. - Automated Buy & Sell:
Uses the Four Meme Launchpad DEX smart contract to buy new tokens and automatically sell them after 60 seconds. - Nonce & Gas Handling:
Handles transaction nonces and gas prices to handle failed/reverted transaction errors.
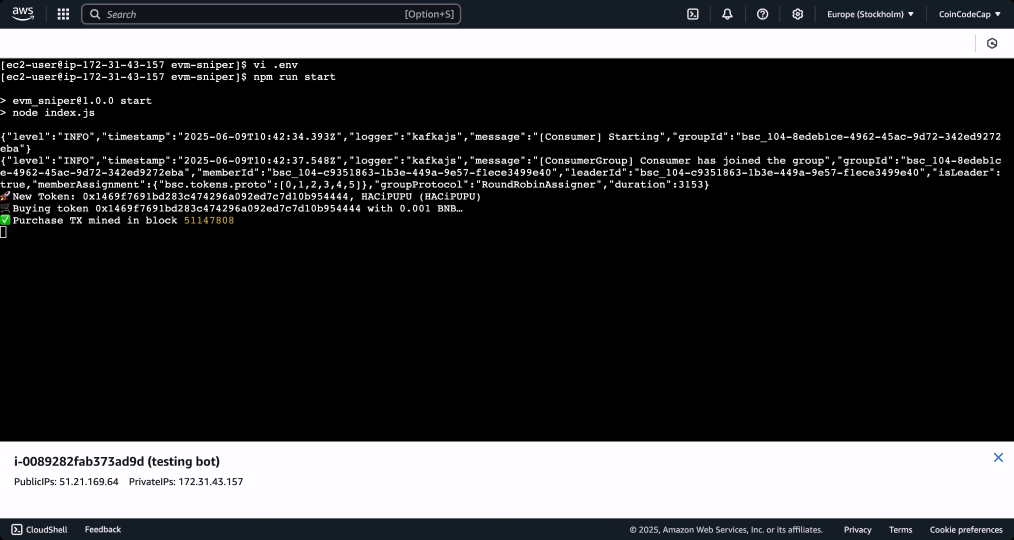
Final Output
Creating .env File
Create a .env file and define these variables.
- PRIVATE_KEY1: Private key of your custodial wallet.
- KAFKA_USERNAME: Bitquery Protobuf Kafka stream username. Contact us on our Telegram Channel
- KAFKA_PASSWORD: Bitquery Protobuf Kafka stream password.
Understanding the Functions
In this section, we will explore the code logic behind the important functions used in our trading bot that are written in executeTrade.js file, namely:
buyViaLaunchpadsellTokenViaLaunchpadsendTxWithNonce
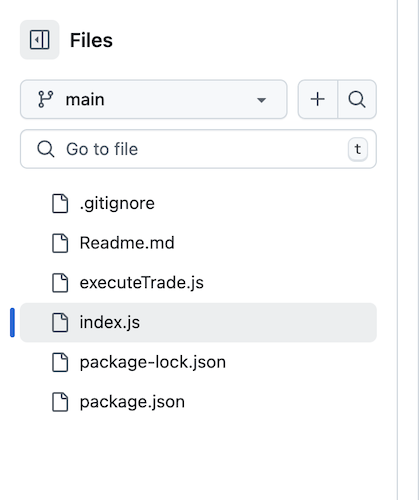
This is how the folder structure looks.
The code snippet below includes all the imports for the executeTrade.js file and setup wallet and provider for trade execution.
import { JsonRpcProvider, Wallet, parseEther, ethers } from "ethers";
import dotenv from "dotenv";
dotenv.config();

const RPC_URL = "https://bsc-dataseed.binance.org/";
const provider = new JsonRpcProvider(RPC_URL);
const privateKey = process.env.PRIVATE_KEY1;
const wallet = new Wallet(privateKey, provider);
Setting Up the Kafka Consumer to Listen to Bitquery Streams
In this section we will setup a Kafka consumer in JS using the kafkajs library. Extended tutorials for other languages are available above.
Imports
import { Kafka } from "kafkajs";
import bs58 from "bs58";
import { loadProto } from "bitquery-protobuf-schema";
import pkg from "kafkajs";
import LZ4 from "kafkajs-lz4";
import { v4 as uuidv4 } from "uuid";
import { buyViaLaunchpad, sellTokenViaLaunchpad } from "./executeTrade.js";
const { CompressionTypes, CompressionCodecs } = pkg;
CompressionCodecs[CompressionTypes.LZ4] = new LZ4().codec;
Defining Constants
const username = process.env.KAFKA_USERNAME;
const password = process.env.KAFKA_PASSWORD;
const topic = "bsc.tokens.proto";
const id = uuidv4();
Initialising Kafka Consumer
const kafka = new Kafka({
  clientId: username,
  brokers: [
    "rpk0.bitquery.io:9092",
    "rpk1.bitquery.io:9092",
    "rpk2.bitquery.io:9092",
  ],
  sasl: {
    mechanism: "scram-sha-512",
    username: username,
    password: password,
  },
});

const consumer = kafka.consumer({ groupId: username + "-" + id });
Creating convertBytes Helper Function
Since the on-chain data is encoded in hex, we will need a convert function to get them into human readable format.
const convertBytes = (value, encoding = "hex") => {
  if (encoding === "base58") {
    return bs58.default.encode(value);
  }
  return value?.toString("hex");
};
Send Transaction with Nonce Functionality
The main purpose of this function is to make the overall trade execution of the bot less prone to errors due to transaction failure/revert. This would avoid scenarios where a token might be purchased but not sold due to transaction failure, which could lead to losses.
- Defining Variable and Nonce Initiator
let nextNonce;

async function initNonce() {
  const current = await provider.getTransactionCount(wallet.address, "pending");
  nextNonce = BigInt(current);
}
- Creating the
sendTxWithNonceFunction
async function sendTxWithNonce(txRequest, maxRetries = 3) {
  if (typeof nextNonce === "undefined") {
    // If nonce not initialized yet, wait briefly
    await new Promise((r) => setTimeout(r, 500));
  }

  for (let attempt = 0; attempt <= maxRetries; attempt++) {
    try {
      // Attach the current nonce
      txRequest.nonce = Number(nextNonce);
      // Slot in a default gasPrice if not explicitly set:
      if (!txRequest.gasPrice) {
        const base = (await provider.getFeeData()).gasPrice;
        txRequest.gasPrice = base;
      }

      const txResponse = await wallet.sendTransaction(txRequest);
      nextNonce++; // only bump after successful send
      return await txResponse.wait();
    } catch (err) {
      const msg = (err.reason || err.message || "").toLowerCase();
      if (msg.includes("replacement underpriced") && attempt < maxRetries) {
        // bump gasPrice by ~10% and retry
        const bumped = (BigInt(txRequest.gasPrice) * 110n) / 100n;
        txRequest.gasPrice = bumped;
        console.warn(
          `⚠️ Replacement underpriced—bumping gas to ${bumped.toString()} and retrying (${
            attempt + 1
          }/${maxRetries})`
        );
        continue;
      }
      throw err;
    }
  }
  throw new Error("Exceeded maxRetries for transaction");
}
Buy Token Functionality via Launchpad
In this section we will how to automate the buy functionality using etherjs.
The code snippets given below are written in executeTrade.js file, which is in the same directory as the index.js(entrypoint) file.
- Defining Constants
// Launchpad contract (for both buy and sell)
const LAUNCHPAD_ADDRESS = ethers.getAddress(
  "0x5c952063c7fc8610ffdb798152d69f0b9550762b"
);
const BUY_ABI = [
  {
    inputs: [
      { internalType: "address", name: "token", type: "address" },
      { internalType: "address", name: "to", type: "address" },
      { internalType: "uint256", name: "funds", type: "uint256" },
      { internalType: "uint256", name: "minAmount", type: "uint256" },
    ],
    name: "buyTokenAMAP",
    outputs: [],
    stateMutability: "payable",
    type: "function",
  },
];

const buyContract = new ethers.Contract(LAUNCHPAD_ADDRESS, BUY_ABI, wallet);
- Creating the Buy Function
export async function buyViaLaunchpad(
  tokenAddress,
  amountBNB = "0.001",
  minAmount = 0n
) {
  await initNonce();
  try {
    const funds = parseEther(amountBNB);
    console.log(`🛒 Buying token ${tokenAddress} with ${amountBNB} BNB…`);
    const data = buyContract.interface.encodeFunctionData("buyTokenAMAP", [
      tokenAddress,
      wallet.address,
      funds,
      minAmount,
    ]);

    const txRequest = {
      to: LAUNCHPAD_ADDRESS,
      data,
      value: funds,
      gasLimit: 300_000,
    };

    const receipt = await sendTxWithNonce(txRequest);
    console.log("✅ Purchase TX mined in block", receipt.blockNumber);
    return receipt;
  } catch (err) {
    console.error("❌ Purchase failed:", err.reason || err.message || err);
    return null;
  }
}
Sell Token Functionality via Launchpad
- Defining Constants
const SELL_ABI = [
  {
    constant: false,
    inputs: [
      { name: "token", type: "address" },
      { name: "amount", type: "uint256" },
    ],
    name: "sellToken",
    outputs: [],
    payable: false,
    type: "function",
  },
];
const ERC20_ABI = [
  "function approve(address spender, uint256 amount) external returns (bool)",
  "function decimals() view returns (uint8)",
  "function balanceOf(address account) view returns (uint256)",
];

const sellContract = new ethers.Contract(LAUNCHPAD_ADDRESS, SELL_ABI, wallet);
- Creating the Sell Token Function
export async function sellTokenViaLaunchpad(tokenAddress) {
  await initNonce();
  try {
    const tokenContract = new ethers.Contract(tokenAddress, ERC20_ABI, wallet);

    // 1) fetch decimals + balance
    const [decimals, rawBalance] = await Promise.all([
      tokenContract.decimals(),
      tokenContract.balanceOf(wallet.address),
    ]);
    if (rawBalance === 0n) {
      console.log(`⚠️ Balance is zero for ${tokenAddress}, skipping sell.`);
      return null;
    }

    console.log(`🔓 Approving ${rawBalance.toString()} tokens for sale…`);
    const approveData = tokenContract.interface.encodeFunctionData("approve", [
      LAUNCHPAD_ADDRESS,
      rawBalance,
    ]);
    await sendTxWithNonce({
      to: tokenAddress,
      data: approveData,
      gasLimit: 100_000,
    });

    console.log(`💰 Selling ${rawBalance.toString()} of ${tokenAddress}…`);
    const sellData = sellContract.interface.encodeFunctionData("sellToken", [
      tokenAddress,
      rawBalance,
    ]);
    const txRequest = {
      to: LAUNCHPAD_ADDRESS,
      data: sellData,
      gasLimit: 300_000,
    };

    const receipt = await sendTxWithNonce(txRequest);
    console.log("✅ Sell TX mined in block", receipt.blockNumber);
    return receipt;
  } catch (err) {
    console.error("❌ Sale failed:", err.reason || err.message || err);
    return null;
  }
}
Filtering for Four Meme Token Creation in the run Function
This is the main function for this script, where the kafka consumer instance is ran, newly created Four Meme tokens are checked and trades are executed. All the code snippets under this sub-section are written under the run function.
const run = async () => {
    ....
}
- Defining Variables
let ParsedMessage = await loadProto(topic); // Load proto before starting Kafka
await consumer.connect();
await consumer.subscribe({ topic, fromBeginning: false });
const seenTokens = new Set(); // Track processed token addresses
- Running the Consumer Instance
In this section, we use the protobuf schema from the Bitquery library, which is available here. For JS, the schema is available as a package here.
We're listening to bsc.tokens.proto topic, we're using the JS library to match the output to the schema. For the bsc.tokens.proto topic, Bitquery uses the TokenBlockMessage schema which contains the TokenTransfer message format. This structure allows us to parse out key data such as token addresses, transaction senders, and smart contract information.
We're using Four Meme DEX address 0x5c952063c7fc8610ffdb798152d69f0b9550762b to track token creation.
await consumer.run({
  autoCommit: false,
  eachMessage: async ({ message }) => {
    try {
      // Getting Transfers
      const buffer = message.value;
      const decoded = ParsedMessage.decode(buffer);
      const msgObj = ParsedMessage.toObject(decoded, { bytes: Buffer });
      const transfers = msgObj.Transfers;
      // Iterating Transfers
      for (let i in transfers) {
        const transfer = transfers[i];
        const to = `0x${convertBytes(transfer.TransactionHeader.To)}`;
        const sender = `0x${convertBytes(transfer.Sender)}`;
        const tokenAddr = `0x${convertBytes(transfer.Currency.SmartContract)}`;
        const name = transfer.Currency.Name;
        const symbol = transfer.Currency.Symbol;
        // Checking the conditions implying Four Meme Token Creation using the DEX Address
        if (
          to == "0x5c952063c7fc8610ffdb798152d69f0b9550762b" &&
          sender == "0x0000000000000000000000000000000000000000"
        ) {
          // Checking if the token is already seen and updating the list of seen tokens if the token is new
          if (!seenTokens.has(tokenAddr)) {
            seenTokens.add(tokenAddr);
            console.log(`🚀 New Token: ${tokenAddr}, ${name} (${symbol})`);

            // Buying the token
            const buyReceipt = await buyViaLaunchpad(tokenAddr, "0.001", 0n);
            if (buyReceipt) {
              // Schedule Sell in 60 seconds
              setTimeout(async () => {
                try {
                  await sellTokenViaLaunchpad(tokenAddr);
                } catch (e) {
                  console.error(
                    `❌ Sell error for ${tokenAddr}:`,
                    e.reason || e.message || e
                  );
                }
              }, 60 * 1000);
            }
          }
        }
      }
    } catch (err) {
      console.error("Error decoding Protobuf message:", err);
    }
  },
});
Creating the Entrypoint for the script
run().catch(console.error);
Running the Script
To run the bot script locally, enter the following command
node index.js
You can also, run this script on cloud platforms by getting a VM(virtual machine instance). Once you have a VM with Node, Git and NPM installed, you can get the code on the same VM using these commands.
git clone < repository link >
cd < folder name >
sudo npm install -g pm2
pm2 start index.js --name "evm-sniper"
The status and logs of the bot could be checked using these commands
pm2 status
pm2 logs evm-sniper
Important Notes
- Test carefully! On-chain transactions are irreversible.
- Gas fees and front-running risks exist on BSC—proceed at your own risk.
- Code is for educational and research purposes only.